
Tuesday, January 8, 2013
Monday, January 7, 2013
Happy Monday. I began a new project this weekend for another neighbor. This one is a set of kitchen utility tables, bookending her stove. Each table will be a unique size and shape, but solid, highly functional and tailored to fit the space, which is abutting an angled firewall in her kitchen. After some discussion with her and recon work, I settled on using Ash as the raw material for these pieces. It is a beautiful blond wood with a heavy grain that is easy to saw and has the resiliency that makes it a wood of choice for many different uses. Wooden baseball bats are often made from Ash, as well as bows and guitars.
A close up of the wood stock. On top are 5/4 x 10" S4S, finished on all 4 sides; the larger piece on the bottom is 12/4 rough cut, which will require milling in order to make it a finished wood:

The 5/4 is being glued together to make a smooth, even surface:

The next day, the glue has dried and the boards are now a single 27 1/2 x 80" piece, ready for trimming to the correct dimensions:


I'll follow up with further posts as these tables come together. Once the legs are milled, I will cut the top to the right dimensions and the cross pieces supporting the top and shelf below.

The 5/4 is being glued together to make a smooth, even surface:


The next task is the table legs. The 12/4 must be milled and cut to the right size, roughly 2 1/2 x 3". As seen below, the 12/4 has now been cut into 36" lengths and planed to an even surface on front and back:

The table legs have been cut to the right dimensions and now require additional milling to achieve a finished smoothness:

Monday, December 3, 2012
Plate Rail for Dan & Steve
I recently completed a fun project crafting and installing a plate rail in the dining room of Dan & Steve's home. As can be seen below, there is a line on the wall, which has a gap of about three inches needing to be covered. The story goes that there was something there originally, but previous owners had removed it and covered it (partially) with a 1x4 pine board that does not match the paneling. I was engaged to create a plate rail as a decorative and functional architectural feature.


Some design inspiration from the mantel in the living room.


Some design inspiration from the mantel in the living room.

A mock-up of the new design a pleasing combination of combination of fabricated pieces, molding and dimensional lumber; red oak stained to a mahogany brown, closely matching the existing paneling.

One of the blocks being glued with molding.

Installation of the blocks, crown molding and shelf. The facing molding has yet to be attached.

A more finished look. A section of the plate rail that has been completed.

The project is finished, literally! Everyone is happy. When I get the chance I will post a few photos (with better light!) of the final project with the furniture back in place.
France Trip
A brief note about something I learned while visiting Bordeaux, the French are not afraid to embrace the new if it is done right.


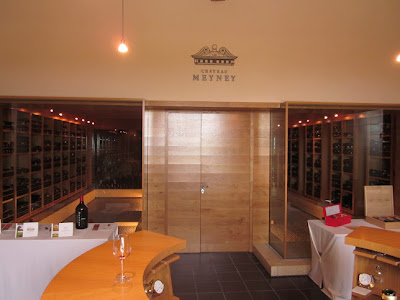


I'm not an ultra-modernist, I like to preserve and restore whenever possible, but I have to admit that when it is done right a new approach can be quite stunning.


Chair Restoration for Mark
Mark asked me to restore this family heirloom, a high chair once owned by his grandmother. It mostly needed to be cleaned up, with paint drips removed and one minor repair to replace a missing rung of the chair.


The chair has been gently cleaned up, no more paint spots, and is being finished with a tung oil. The rung has been replace and stained to match.

Friday, October 5, 2012

Recently completely a project for Carmen and Luis, replacing their back steps and adding some railing to their deck. I removed the old steps and constructed new ones from treated lumber, then painted the new steps to match.
The old steps were falling down and rotted, (Not a moment too soon to replace them!):


Obviously, the choice was to make the steps fit into the existing color scheme. Not matter what, they are much stronger and sturdier than the previous ones.
The old steps were falling down and rotted, (Not a moment too soon to replace them!):


Freshly constructed steps, now anchored to the brick pillars; reinforced with three stringers, not two; nor more untreated wood. These steps should last a lot longer. I've added a seventh step to achieve a normal step height:

The final product, painted to match the existing deck:

Subscribe to:
Posts (Atom)